3. Now you have to go to the SQLite Database Browser that you have just downloaded and run it. Here you have to create the tables, the columns etc. I will show you how in the following lines, so pay attention :D
- Create a new database


- Populate the database
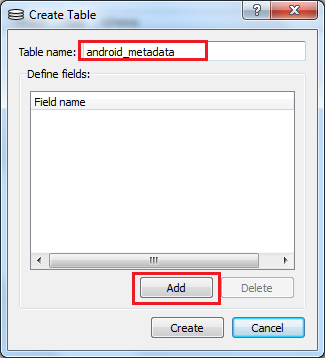


And finally we can create our own tables. You must create a table called “People”, with 2 columns: one called “Name” and the other one called “_id” . Technically the field _id is not required, however if you will use of the CursorAdapter class then you it is required .To create a new table follow the steps from the picture bellow:

Now you must add the column “_id” too so press the Add button and enter the information like in the picture:

NOTE: Don’t forget to SAVE the database changes.
4. Now we have to start coding.
- First you have to create a new class called “ApplicationContextProvider” which will provide the context wherever in the application. The code looks like this:
import android.app.Application;
import android.content.Context;


public class ApplicationContextProvider extends Application {

    /**
     * Keeps a reference of the application context
     */
    private static Context sContext;

    @Override
    public void onCreate() {
        super.onCreate();

        sContext = getApplicationContext();

    }

    /**
     * Returns the application context
     *
     * @return application context
     */
    public static Context getContext() {
        return sContext;
    }

}
Now you have to declare this class in the AndroidManifest.xml in the application tag:
<application android:name=".ApplicationContextProvider"
             android:label="@string/app_name">

- Create a new class for database code, called “DataBaseManager”. The code looks like this:
import android.content.ContentValues;
import android.database.Cursor;
import android.database.SQLException;
import android.database.sqlite.SQLiteDatabase;
import android.database.sqlite.SQLiteException;
import android.database.sqlite.SQLiteOpenHelper;

import java.io.FileOutputStream;
import java.io.IOException;
import java.io.InputStream;
import java.io.OutputStream;


public class DataBaseManager extends SQLiteOpenHelper {

    // The Android's default system path of your application database.
    //data/data/ and /databases remain the same always. The one that must be changed is com.example which represents
    //the MAIN package of your project
    private static String DB_PATH = "/data/data/com.example/databases/";

    //the name of your database
    private static String DB_NAME = "database";

    private static SQLiteDatabase mDataBase;

    private static DataBaseManager sInstance = null;
    // database version
    private static final int DATABASE_VERSION = 1;

    /**
     * Constructor Takes and keeps a reference of the passed context in order to
     * access to the application assets and resources.
     */
    private DataBaseManager() {
        super(ApplicationContextProvider.getContext(), DB_NAME, null, DATABASE_VERSION);

        try {
            createDataBase();
            openDataBase();
        } catch (IOException e) {
            e.printStackTrace();
        }

    }

    /**
     * Singleton for DataBase
     *
     * @return singleton instance
     */
    public static DataBaseManager instance() {

        if (sInstance == null) {
            sInstance = new DataBaseManager();
        }
        return sInstance;
    }


    /**
     * Creates a empty database on the system and rewrites it with your own
     * database.
     *
     * @throws java.io.IOException io exception
     */
    private void createDataBase() throws IOException {

        boolean dbExist = checkDataBase();

        if (dbExist) {
            // do nothing - database already exist
        } else {

            // By calling this method an empty database will be created into
            // the default system path
            // of your application so we are gonna be able to overwrite that
            // database with our database.
            this.getReadableDatabase();

            try {

                copyDataBase();

            } catch (IOException e) {

                throw new Error("Error copying database");
            }
        }
    }

    /**
     * Check if the database already exist to avoid re-copying the file each
     * time you open the application.
     *
     * @return true if it exists, false if it doesn't
     */
    private boolean checkDataBase() {

        SQLiteDatabase checkDB = null;

        try {
            String myPath = DB_PATH + DB_NAME;
            checkDB = SQLiteDatabase.openDatabase(myPath, null,
                    SQLiteDatabase.OPEN_READONLY);

        } catch (SQLiteException e) {

            // database doesn't exist yet.

        }

        if (checkDB != null) {

            checkDB.close();

        }

        return checkDB != null;
    }

    /**
     * Copies your database from your local assets-folder to the just created
     * empty database in the system folder, from where it can be accessed and
     * handled. This is done by transfering bytestream.
     *
     * @throws java.io.IOException io exception
     */
    public void copyDataBase() throws IOException {

        // Open your local db as the input stream
        InputStream myInput = ApplicationContextProvider.getContext().getAssets().open(DB_NAME);

        // Path to the just created empty db
        String outFileName = DB_PATH + DB_NAME;

        // Open the empty db as the output stream
        OutputStream myOutput = new FileOutputStream(outFileName);

        // transfer bytes from the inputfile to the outputfile
        byte[] buffer = new byte[1024];
        int length;
        while ((length = myInput.read(buffer)) > 0) {
            myOutput.write(buffer, 0, length);
        }

        // Close the streams
        myOutput.flush();
        myOutput.close();
        myInput.close();

    }

    private void openDataBase() throws SQLException {

        // Open the database
        String myPath = DB_PATH + DB_NAME;
        mDataBase = SQLiteDatabase.openDatabase(myPath, null,
                SQLiteDatabase.OPEN_READWRITE);
    }

    /**
     * Select method
     *
     * @param query select query
     * @return - Cursor with the results
     * @throws android.database.SQLException sql exception
     */
    public Cursor select(String query) throws SQLException {
        return mDataBase.rawQuery(query, null);
    }

    /**
     * Insert method
     *
     * @param table  - name of the table
     * @param values values to insert
     * @throws android.database.SQLException sql exception
     */
    public void insert(String table, ContentValues values) throws SQLException {
        mDataBase.insert(table, null, values);
    }

    /**
     * Delete method
     *
     * @param table - table name
     * @param where WHERE clause, if pass null, all the rows will be deleted
     * @throws android.database.SQLException sql exception
     */
    public void delete(String table, String where) throws SQLException {

        mDataBase.delete(table, where, null);

    }

    /**
     * Update method
     *
     * @param table  - table name
     * @param values - values to update
     * @param where  - WHERE clause, if pass null, all rows will be updated
     */
    public void update(String table, ContentValues values, String where) {

        mDataBase.update(table, values, where, null);

    }

    /**
     * Let you make a raw query
     *
     * @param command - the sql comand you want to run
     */
    public void sqlCommand(String command) {
        mDataBase.execSQL(command);
    }

    @Override
    public synchronized void close() {

        if (mDataBase != null)
            mDataBase.close();

        super.close();

    }

    @Override
    public void onCreate(SQLiteDatabase db) {

    }

    @Override
    public void onUpgrade(SQLiteDatabase db, int oldVersion, int newVersion) {

    }

}
Now please pay attention at private static String DB_PATH = “/data/data/com.example/databases/”; and private static String DB_NAME = “database”; This two variable must be changed depending of your project. DB_PATH general code looks like this:
private static String DB_PATH = "/data/data/YOUR_MAIN_PACKAGE/databases/";
But what “MAIN_PACKAGE” means? For example let’s imagine that we have a main package called “com.example” and inside this package we have another package called “com.example.utils”. If the DataBaseManager is situated in the “com.example.utils” package the DB_PATH will be:
private static String DB_PATH = "/data/data/com.example/databases/";
and NOT:
private static String DB_PATH = "/data/data/com.example.utils/databases/";
And DB_NAME general code looks like this:
private static String DB_NAME = "YOUR_DATABASE_NAME";
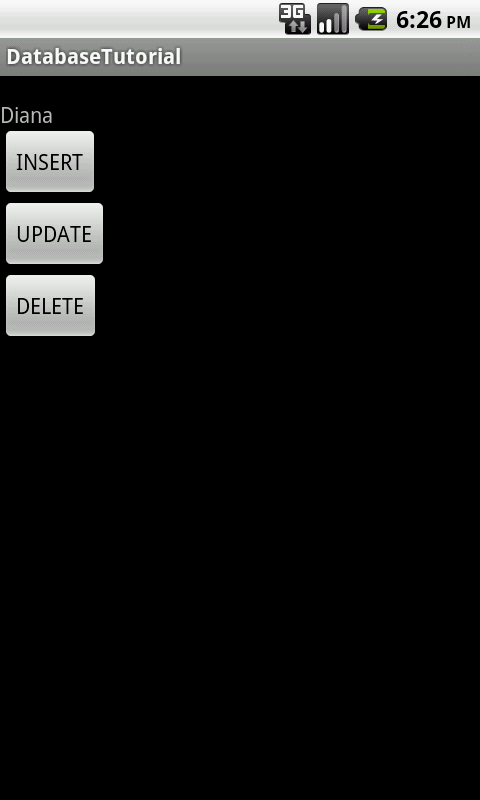
- Now go to “res – layout – main.xml” and put the following code. We create a text view to see the names and 3 buttons for: Insert, Update and Delete.
<?xml version="1.0" encoding="utf-8"?>
<LinearLayout xmlns:android="http://schemas.android.com/apk/res/android"
              android:orientation="vertical"
              android:layout_width="fill_parent"
              android:layout_height="fill_parent">

    <TextView
            android:layout_width="fill_parent"
            android:layout_height="wrap_content"
            android:id="@+id/name_1"/>

    <Button android:layout_width="wrap_content"
            android:layout_height="wrap_content"
            android:id="@+id/insert"
            android:text="INSERT"/>

    <Button android:layout_width="wrap_content"
            android:layout_height="wrap_content"
            android:id="@+id/update"
            android:text="UPDATE"/>

    <Button android:layout_width="wrap_content"
            android:layout_height="wrap_content"
            android:id="@+id/delete"
            android:text="DELETE"/>
</LinearLayout>
- Now go to the “MyActivity” class and put this code:
import android.app.Activity;
import android.content.ContentValues;
import android.database.Cursor;
import android.os.Bundle;
import android.view.View;
import android.widget.Button;
import android.widget.TextView;
import android.widget.Toast;

public class MyActivity extends Activity
{
    private DataBaseManager dataBase;

    private Button insertButton;
    private Button updateButton;
    private Button deleteButton;

    private TextView textView;

    //put the table name and column in constants
    public static final String TABLE_NAME = "People";
    public static final String COLUMN_NAME = "name";

    /** Called when the activity is first created. */
    @Override
    public void onCreate(Bundle savedInstanceState)
    {
        super.onCreate(savedInstanceState);
        setContentView(R.layout.main);

        //creates and open the database so we can use it
        dataBase = DataBaseManager.instance();

        textView = (TextView)findViewById(R.id.name_1);
        insertButton = (Button)findViewById(R.id.insert);
        updateButton = (Button)findViewById(R.id.update);
        deleteButton = (Button)findViewById(R.id.delete);

        insertButton.setOnClickListener(new View.OnClickListener() {
            @Override
            public void onClick(View view) {

                //with ContentValues put the data we want into the database
                ContentValues values = new ContentValues();
                values.put(COLUMN_NAME, "Diana");

                //here we insert the data we have put in values
                dataBase.insert(TABLE_NAME, values);

                updateTextView();

            }
        });

        updateButton.setOnClickListener(new View.OnClickListener() {
            @Override
            public void onClick(View view) {

                //with ContentValues put the data we want into the database
                ContentValues values = new ContentValues();
                values.put(COLUMN_NAME,"George");

                //here we replace the record which has the _id=1 with the given name in the values "George"
                dataBase.update(TABLE_NAME, values, "_id=1");

                updateTextView();
            }
        });

        deleteButton.setOnClickListener(new View.OnClickListener() {
            @Override
            public void onClick(View view) {

                //here we delete the record which has the "name=George"
                dataBase.delete(TABLE_NAME,"name='George'");

                updateTextView();


            }
        });

    }

    public void updateTextView(){
        //to get data from database we need a cursor.
        //after we perform a select query all the data from database specific for the query, will be in the cursor
        // "*" means "all" in translation the query means "SELECT ALL FROM NAME TABLE"
        Cursor cursor = dataBase.select("SELECT * FROM " + TABLE_NAME);

        textView.setText("");
        //the cursor iterates the column "name"
        while (cursor.moveToNext()){
            //in this string we get the record for each row from the column "name"

            String s = cursor.getString(cursor.getColumnIndex(COLUMN_NAME));

            //in this textView will be added, updated or deleted the string
            // "\n" means "new line"
            textView.append("\n" + s);
        }

        //here we close the cursor because we do not longer need it
        cursor.close();
    }
}
INSERT, UPDATE, DELETE and SELECT.
The general code for INSERT into database is:
ContentValues values = new ContentValues();
              values.put(COLUMN_NAME, "WHAT YOU WANT TO INSERT");
              dataBase.insert(TABLE_NAME, values);
The general code for UPDATE something from database is:
ContentValues values = new ContentValues();
               values.put(COLUMN_NAME,"VALUE WITH WHICH YOU WANT TO UPDATE");
               dataBase.update(TABLE_NAME, values, WHERE CLAUSE like "id='1'" or name="sam" etc);
The general code for DELETE something from database is:
dataBase.delete(TABLE_NAME,WHERE CLAUSE like "name='George'");
The general code for SELECT something from database is:
NOTE: If you make any changes to the database (create a new table, or a new column etc) you must uninstall your project from emulator or test device and run again your project. You have to do this because the previous database doesn’t update “in real time” with changes you make on it’s structure.
Now you can test the application :)