In this tutorial we will talk about Build Types and Flavors, for what are they used, what is the difference between them and what they have in common.
Build Types
When you work on a project, at some point you might need to run your app in release mode, or debug mode, or qa mode, or any other mode you might need.
Why would I need this?
- to have a signed apk with a release key for release mode, and non-signed with a release key for debug mode (debug key used instead)
- to use different web service calls for qa mode, release mode, debug mode, etc, in case your web service team has different environments
- to add a package name sufix.
E.g:
applicationIdSuffix ".qa"
- require extra permissions in debug mode, like ACCESS_MOCK_LOCATION for example.
Build Types Configuration
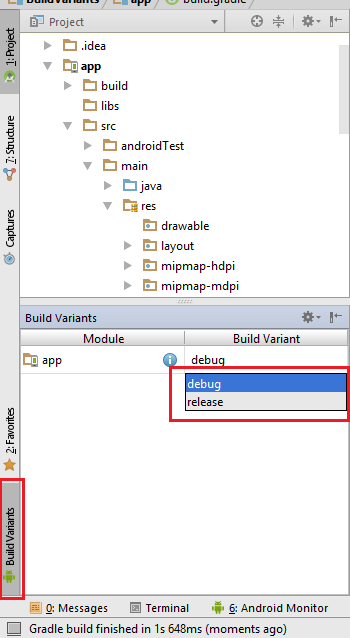
When you create an app, debug and release types are created by default. You can see them in Android Studio, by clicking on BuildVariants button on the bottom left of the Android Studio.
But if you need to add new Build Types, like QA for example, or DEV, or whatever you need you have to follow these steps:
- Open build.gradle file from app directory (your module-level). Note: to not be confused with build.gradle of the project, which is located in the root of your project.
- Inside android {} block, you should already have buildTypes{} declared with release type in it. You just have to add your new build types you want. In our example we will add qa type:
apply plugin: 'com.android.application'

android {
    compileSdkVersion 23
    buildToolsVersion "23.0.3"
    defaultConfig {
        applicationId "com.example.diana.buildvariants"
        minSdkVersion 15
        targetSdkVersion 23
        versionCode 1
        versionName "1.0"
        testInstrumentationRunner "android.support.test.runner.AndroidJUnitRunner"
    }

    buildTypes {
        release {
            minifyEnabled false
            proguardFiles getDefaultProguardFile('proguard-android.txt'), 'proguard-rules.pro'
        }

        qa {
            applicationIdSuffix ".qa"

            // signingConfigs as debug key needed. Otherwise, the app won't run and it will ask
            // you to sign the apk
            signingConfig signingConfigs.debug
        }
    }
}

dependencies {
    compile fileTree(dir: 'libs', include: ['*.jar'])
    compile 'com.android.support:appcompat-v7:23.4.0'
    compile 'com.android.support.constraint:constraint-layout:1.0.0-alpha3'
    testCompile 'junit:junit:4.12'
    androidTestCompile 'com.android.support.test.espresso:espresso-core:2.2.2'
    androidTestCompile 'com.android.support.test:runner:0.5'
    androidTestCompile 'com.android.support:support-annotations:23.4.0'
}
3. Now, you have to tap on sync gradle popup that will be displayed.

4. After the sync is done, click again on Build Variants button from the bottom-left of Android Studio and notice that now we have 3 build types:

So now, if you want ro run your app in qa mode, just select qa type from here and run the app.
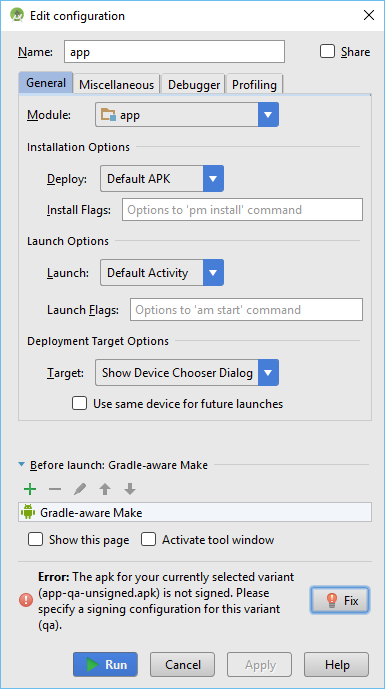
NOTE: Notice we added the signingConfig property in build.gradle. That was needed, because otherwise the app would not run and the following error will be displayed when you try to run the app:
Error: The apk for your currenlty selected variant (app-qa-unsigned.apk) is not signed.
Please specify a signing configuration for this variant (qa)
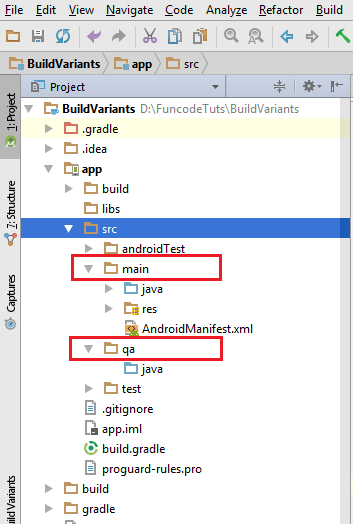
Create new source set directory for QA build type
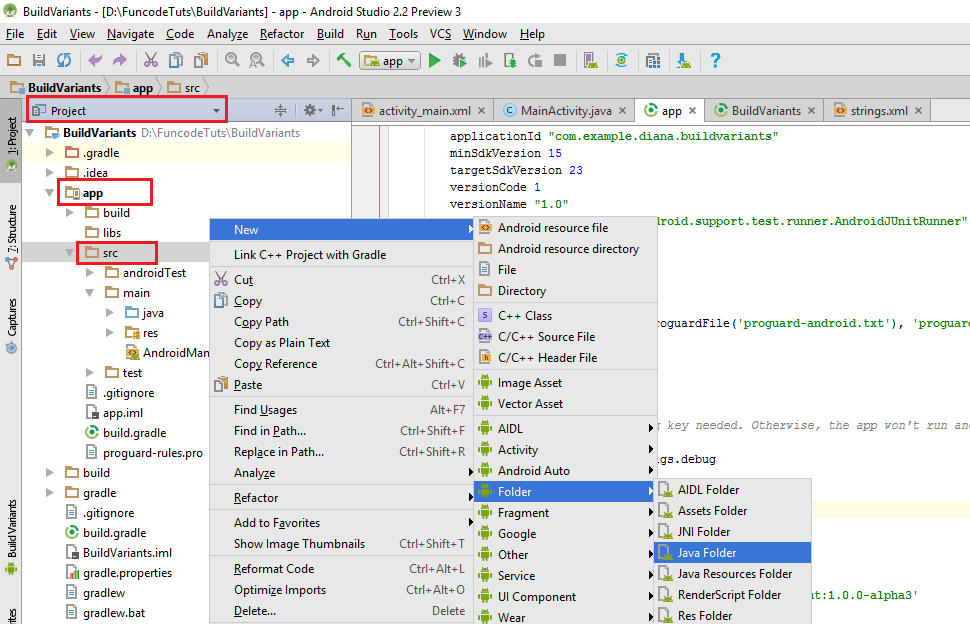
Now that you have configured your new build type (QA), you need to create a new folder for QA in the project structure where you can override what you need.
- From app – src – right click on src folder – click New – Folder – Java Folder – From Target Source Set select qa
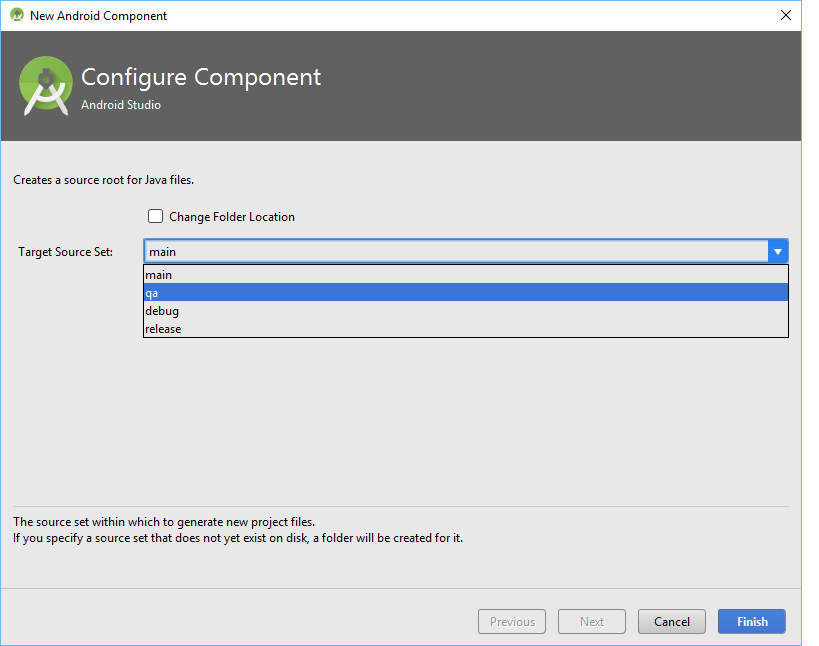
Now you should have 2 source type directories. main and qa, but in qa directory you will have just an empty java folder so you will have to add manually the other resource folders you wil need by always specifying the target source.
Product Flavors
Flavors are similar in a way to Build Types, but they are used in case you need different versions of the same app. The best example in this case is free version vs paid version of an app. Or also flavors are used in case of rebranding an app (different resource files and slightly different code).
Product Flavors Configuration
  productFlavors {
        free {
            applicationId "com.example.myapp.free"
            versionName "1.0-free"
        }

        paid {
            applicationId "com.example.myapp.paid"
            versionName "1.0-paid"
        }
    }
- Open build.gradle file from app directory (your module-level), the same build.gradle used for Build Types.
- Inside android {} block, below buildTypes{} add the above code.
The final gradle files should look like this:
apply plugin: 'com.android.application'

android {
    compileSdkVersion 23
    buildToolsVersion "23.0.3"
    defaultConfig {
        applicationId "com.example.diana.buildvariants"
        minSdkVersion 15
        targetSdkVersion 23
        versionCode 1
        versionName "1.0"
        testInstrumentationRunner "android.support.test.runner.AndroidJUnitRunner"
    }

    signingConfigs {
        paidRelease {
            storeFile file("..\\keystore")
            storePassword "mypass"
            keyAlias "keystore"
            keyPassword "mypass"
        }
        freeRelease {
            storeFile file("..\\keystore")
            storePassword "mypass"
            keyAlias "keystore"
            keyPassword "mypass"
        }
    }

    buildTypes {
        release {
            minifyEnabled false
            proguardFiles getDefaultProguardFile('proguard-android.txt'), 'proguard-rules.pro'

            productFlavors.free.signingConfig signingConfigs.freeRelease
            productFlavors.paid.signingConfig signingConfigs.paidRelease
        }

        qa {
            applicationIdSuffix ".qa"

            // signingConfigs as debug key needed. Otherwise, the app won't run and it will ask
            // you to sign the apk
            signingConfig signingConfigs.debug
        }
    }

    productFlavors {
        free {
            applicationId "com.example.myapp.free"
            versionName "1.0-free"
        }

        paid {
            applicationId "com.example.myapp.paid"
            versionName "1.0-paid"
        }
    }
}

dependencies {
    paidCompile 'com.android.support:design:23.4.0'
    compile fileTree(dir: 'libs', include: ['*.jar'])
    compile 'com.android.support:appcompat-v7:23.4.0'
    compile 'com.android.support.constraint:constraint-layout:1.0.0-alpha3'
    testCompile 'junit:junit:4.12'
    androidTestCompile 'com.android.support.test.espresso:espresso-core:2.2.2'
    androidTestCompile 'com.android.support.test:runner:0.5'
    androidTestCompile 'com.android.support:support-annotations:23.4.0'
}
3. Now sync gradle and look to Build Variants options. You will see a combination between our Build Types and Product Flavors:
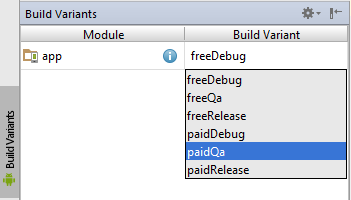
So basically, Build Variants = Product Flavors + Build Types!
Build Types vs Product Flavors
Differences
- Build Types are used for your development cycle (debug, release, qa, staging, etc), while Product Flavors are used for your distribution strategy (free vs paid, rebranding, etc)
- minifyEnabled property can be configured in Build Types, but NOT in Product Flavors
- applicationIdSuffix property can be configured in Build Types, but NOT in Product Flavors
- applicationId can be configured in Product Flavors, but NOT in Build Types
- minSdkVersion,targetSdkVersion, versionCode, versionName can be configured in Product Flavors, but NOT in Build Types
Common
- signingConfig property can be set in both
- buildConfig property can be set in both (the ability to provide custom Java code)
- you can set different dependencies (see example code here) inside dependencies{} block by:
- flavors (<flavorName>Compile)
- build type (<buildTypeName>Compile)
- both flavor and build type combined (<flavorName><BuildTypeName>Compile).