After trying some libraries in order to make a cube animation for my viewPager, I realized that is pretty easy to do this. Android provides an interface called ViewPager.PageTransformer and you just have to implement its method transformPage().
Below is the code, step by step.
activity_main.xml
<?xml version="1.0" encoding="utf-8"?>
<LinearLayout xmlns:android="http://schemas.android.com/apk/res/android"
    xmlns:tools="http://schemas.android.com/tools"
    android:layout_width="match_parent"
    android:layout_height="match_parent"
    tools:context="ro.helpproject.funcode.help.MainActivity">


    <android.support.v4.view.ViewPager
        android:id="@+id/pager"
        android:layout_width="match_parent"
        android:layout_height="match_parent" />

</LinearLayout>
view_pager_item.xml
<?xml version="1.0" encoding="utf-8"?>
<LinearLayout xmlns:android="http://schemas.android.com/apk/res/android"
    android:id="@+id/linearLayout_mario"
    android:layout_width="wrap_content"
    android:layout_height="wrap_content"
    android:background="@android:color/black">

    <ImageView
        android:id="@+id/imageView_mario"
        android:layout_width="wrap_content"
        android:layout_height="wrap_content"
        android:src="@drawable/mario" />
</LinearLayout>
And now, the interesting part of the tutorial:
CubeTransformer.java class
package ro.helpproject.funcode.help;

import android.support.v4.view.ViewPager;
import android.view.View;


public class CubeTransformer implements ViewPager.PageTransformer {
    @Override
    public void transformPage(View view, float position) {
        //if position = 0 (current image) pivot on x axis is on the right, else if
        // position > 0, (next image) pivot on x axis is on the left (origin of the axis)
        view.setPivotX(position <= 0 ? view.getWidth() : 0.0f);
        view.setPivotY(view.getHeight() * 0.5f);

        //it rotates with 90 degrees multiplied by current position
        view.setRotationY(90f * position);
    }
}
Let’s explain a bit this code. As you can see, we created a new class CubeTransformer that implements the interface I mentioned at the beginning of the post, ViewPager.PageTransformer. The tranformPage() method that has to be overridden, is called for each visible page and for its adjacent pages (left and right) and requires a view and position.
- view: represents either the current view that starts beeing swiped, either the next one
- position: represents either the position of the current view, either of the next one
- 0 – is for the current view/page when it fills the screen
- 1 – is for next view/page that has just been drawn
- when the user starts to swipe between pages, page one (current) will have positions with negative values, and the next page that has to come in place, will have positions with positive values.
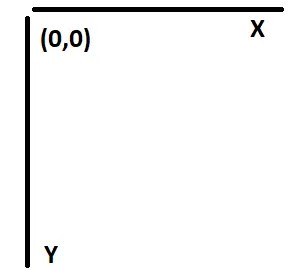
Before going further, we have to mention that in Android the x,y coordinates start from the top left corner.
The animation is done with just 3 lines of code:
- view.setPivotX(): This is like a pin on the x axis around which the view will be rotated and scaled.
In our code, when position <= 0 (current image) we will set the pivot on the rightmost point of the X axis (view.getWidth()) , and when position > 0, (next image) the pivot is set on the left (origin of the axis) on X axis. This way, the pages will look like the faces of a cube.
- view.setPivotY(): This is like a pin on the Y axis, around which the view will be rotated and scaled.
In our code, we set this to be on the halfway on Y axis.
- view.setRotationY(): The view will be rotated vertically around Y axis with 90 degrees on the left multiplied by position.
So, using these 3 lines of code, we can have a cube animation on our viewPager :)
Now, the final step of the tutorial, is about how to use the above class.
MainActivity.java
package ro.helpproject.funcode.help;

import android.app.Activity;
import android.os.Bundle;
import android.support.v4.view.PagerAdapter;
import android.support.v4.view.ViewPager;
import android.view.LayoutInflater;
import android.view.View;
import android.view.ViewGroup;
import android.widget.LinearLayout;

public class MainActivity extends Activity {

    @Override
    protected void onCreate(Bundle savedInstanceState) {
        super.onCreate(savedInstanceState);
        setContentView(R.layout.activity_main);

        MyViewPagerAdapter adapter = new MyViewPagerAdapter();
        ViewPager pager = findViewById(R.id.pager);
        pager.setPageTransformer(true, new CubeTransformer());
        pager.setAdapter(adapter);
    }

    protected class MyViewPagerAdapter extends PagerAdapter {

        @Override
        public int getCount() {
            return 3;
        }

        @Override
        public boolean isViewFromObject(View view, Object object) {
            return view == object;
        }

        @Override
        public Object instantiateItem(ViewGroup container, int position) {
            LayoutInflater inflater = LayoutInflater.from(MainActivity.this);
            LinearLayout linearLayout = (LinearLayout) inflater.inflate(R.layout.view_pager_item, container, false);

            container.addView(linearLayout);
            return linearLayout;
        }

        @Override
        public void destroyItem(ViewGroup container, int position, Object object) {
            container.removeView((View) object);
        }
    }
}
The only new thing in the above code, is this line:
pager.setPageTransformer(true, new CubeTransformer());
The rest of the code is just the usual implementation of a ViewPager.


