About Firebase
First of all, you have to know that using AdMob with Firebase is optional, at least for now, and you can still integrate AdMob by importing compile ‘com.google.android.gms:play-services’ (like in this tutorial). But even if it is optional, it is recommended, as it brings all services like AdMob, Analytics, crash reporting and other services together in just one place.
Integration
Versions used:
- Android Studio 2.2 Preview 3
- classpath google-services 3.0.0 dependency
- firebase-ads 9.0.2 dependency
Project setup for supporting ads
- google-services.json file from Firebase Console
- In Project-level build.gradle add Google Services to dependencies
- In App-level build.gradle add Firebase Ads to dependencies and apply Google Services plugin
- Internet Access
Before we start, create a new project with an Empty Activity template. After the project is created you should have MainActivity.java class and activity_main.xml file in res folder. We will refer to these later in the code.
1. Download google-services.json
This file is mandatory for your project to compile. If google-services.json file is not added to your project, you will get the following error when trying to sync App-level build.gradle.
Error:Execution failed for task ':app:processDebugGoogleServices'.
 > File google-services.json is missing. The Google Services Plugin cannot function without it.
So, in order to download it, you have to register your project in Firebase Console. Below are the steps:
Register project in Firebase Console
- Open Firebase Console and click on the Create New Project button
- Type your app name and click on Create Project button
- Now the following page should open

- Tap on the button like in the above image
- In the new page that will open, type your project’s package name (you can find it in your AndroidManifest.xml file or in activities above imports)

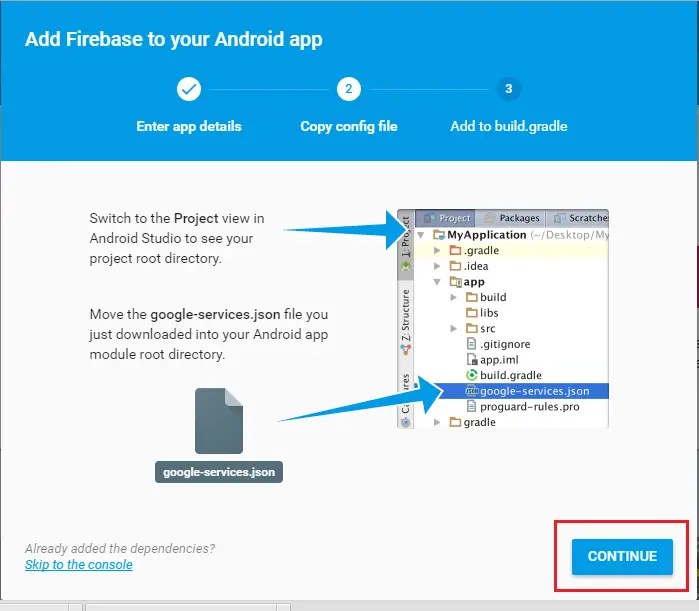
- Now, after you press Add App button, the google-services.json will be automatically downloaded
- Copy the file that has just been downloaded and add it to your project to the application’s root folder, YourAppName/app/

- Click Continue and then Finish


2. Project-level build.gradle
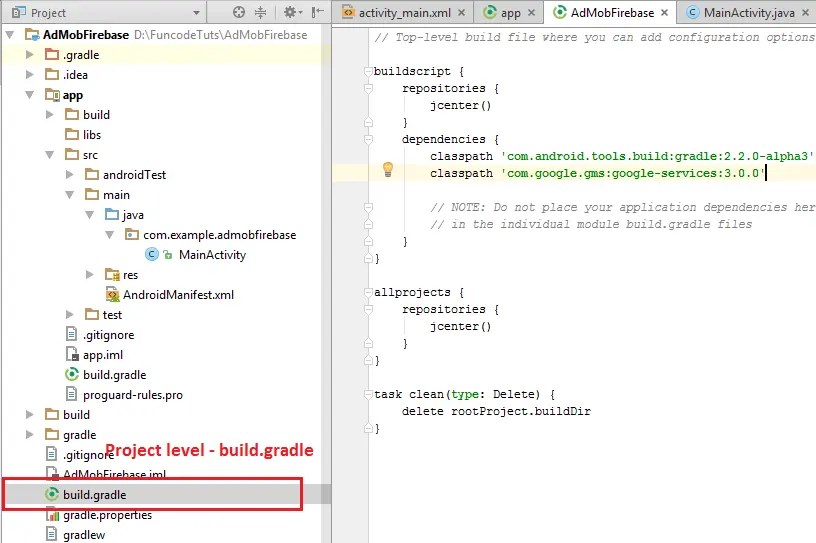
In the build.gradle file which is outside app module, you have to add the following dependency:
classpath 'com.google.gms:google-services:3.0.0'
Now, tap on Sync Now to sync gradle.
3. App-level build.gradle
Inside the app directory you can see another build.gradle file. In this file you have to add 2 lines:
compile 'com.google.firebase:firebase-ads:9.0.2'
apply plugin: 'com.google.gms.google-services'
Below is how the final code should look like:
apply plugin: 'com.android.application'

android {
    compileSdkVersion 23
    buildToolsVersion "23.0.3"
    defaultConfig {
        applicationId "com.example.admobfirebase"
        minSdkVersion 15
        targetSdkVersion 23
        versionCode 1
        versionName "1.0"
        testInstrumentationRunner "android.support.test.runner.AndroidJUnitRunner"
    }
    buildTypes {
        release {
            minifyEnabled false
            proguardFiles getDefaultProguardFile('proguard-android.txt'), 'proguard-rules.pro'
        }
    }
}

dependencies {
    compile fileTree(dir: 'libs', include: ['*.jar'])
    compile 'com.android.support:appcompat-v7:23.4.0'
    compile 'com.android.support.constraint:constraint-layout:1.0.0-alpha3'
    compile 'com.google.firebase:firebase-ads:9.0.2'
    testCompile 'junit:junit:4.12'
    androidTestCompile 'com.android.support.test.espresso:espresso-core:2.2.2'
    androidTestCompile 'com.android.support.test:runner:0.5'
    androidTestCompile 'com.android.support:support-annotations:23.4.0'
}

apply plugin: 'com.google.gms.google-services'
Tap on Sync Now to sync gradle.
4. Internet access
In order to receive ads you need access to internet. So you have to add the code below in the AndroidManifest.xml, right above <aplication> element:
<uses-permission android:name="android.permission.INTERNET" />
<uses-permission android:name="android.permission.ACCESS_NETWORK_STATE" />
Add the ads
-
Go to activity_main.xml file and add the following code
<?xml version="1.0" encoding="utf-8"?>
<android.support.constraint.ConstraintLayout xmlns:android="http://schemas.android.com/apk/res/android"
    xmlns:app="http://schemas.android.com/apk/res-auto"
    xmlns:tools="http://schemas.android.com/tools"
    xmlns:ads="http://schemas.android.com/apk/res-auto"
    android:id="@+id/activity_main"
    android:layout_width="match_parent"
    android:layout_height="match_parent"
    tools:context="com.example.admobfirebase.MainActivity">

    <TextView
        android:layout_width="wrap_content"
        android:layout_height="wrap_content"
        android:text="Hello World!"
        android:id="@+id/textView"
        app:layout_constraintLeft_toLeftOf="@+id/activity_main"
        app:layout_constraintTop_toTopOf="@+id/activity_main"
        app:layout_constraintRight_toRightOf="@+id/activity_main"
        app:layout_constraintBottom_toBottomOf="@+id/activity_main" />

    <com.google.android.gms.ads.AdView
        android:id="@+id/adMob"
        android:layout_width="wrap_content"
        android:layout_height="wrap_content"
        ads:adSize="BANNER"
        ads:adUnitId="YOUR UNIT ID"
        app:layout_constraintLeft_toLeftOf="@+id/activity_main"
        app:layout_constraintRight_toRightOf="@+id/activity_main"
        app:layout_constraintBottom_toBottomOf="@+id/activity_main" />

</android.support.constraint.ConstraintLayout>
Note: Notice that in order to use ads: properties we have to add to the root layout
xmlns:ads="http://schemas.android.com/apk/res-auto"
In order to get YOUR UNIT ID you should do the following:
- go to AdMob site, click on the Monetize New App button and add your app.
- If you want to can link the app to Firebase from here. But you can skip an link it later like shown in this tutorial.

- after you add your app, on the Monetize page, you should find your project on the left. Click on it and you will see your Unit ID. Unit IDs have the form
ca-app-pub-XXXXXXXXXXXXXXXX/NNNNNNNNNN.


Now, just copy it from here and paste it into your activity_main.xml file.
-
Go to MainActivity and add this code:
package com.example.admobfirebase;

import android.support.v7.app.AppCompatActivity;
import android.os.Bundle;

import com.google.android.gms.ads.AdRequest;
import com.google.android.gms.ads.AdView;
import com.google.android.gms.ads.MobileAds;

public class MainActivity extends AppCompatActivity {

    @Override
    protected void onCreate(Bundle savedInstanceState) {
        super.onCreate(savedInstanceState);
        setContentView(R.layout.activity_main);

        MobileAds.initialize(getApplicationContext(), "YOUR APP ID");

        AdView adView = (AdView) this.findViewById(R.id.adMob);
        //request TEST ads to avoid being disabled for clicking your own ads
        AdRequest aRequest = new AdRequest.Builder()
                .addTestDevice(AdRequest.DEVICE_ID_EMULATOR)// This is for emulators
                //test mode on DEVICE (this example code must be replaced with your device uniquq ID)
                .addTestDevice("2EAB96D84FE62876379A9C030AA6A0AC") // Nexus 5
                .build();
        adView.loadAd(adRequest);
    }
}


NOTES
NOTE 1:
YOUR APP ID is different from Ad Unit Id. Application IDs have the form ca-app-pub-XXXXXXXXXXXXXXXX~NNNNNNNNNN and can be found on your AdMob account page by clicking the Settings icon – App Management.
NOTE 2:
It is very important to run the ads in debug mode on your own devices, in order to avoid being disabled for clicking your own ads. So, to get your device ID, you have to run your application on the DEVICE in debug mode and wait for an ad to load. Then go to logcat output and search for the ID. It should be at Log INFO like in the picture below. You can add as many devices as you want.

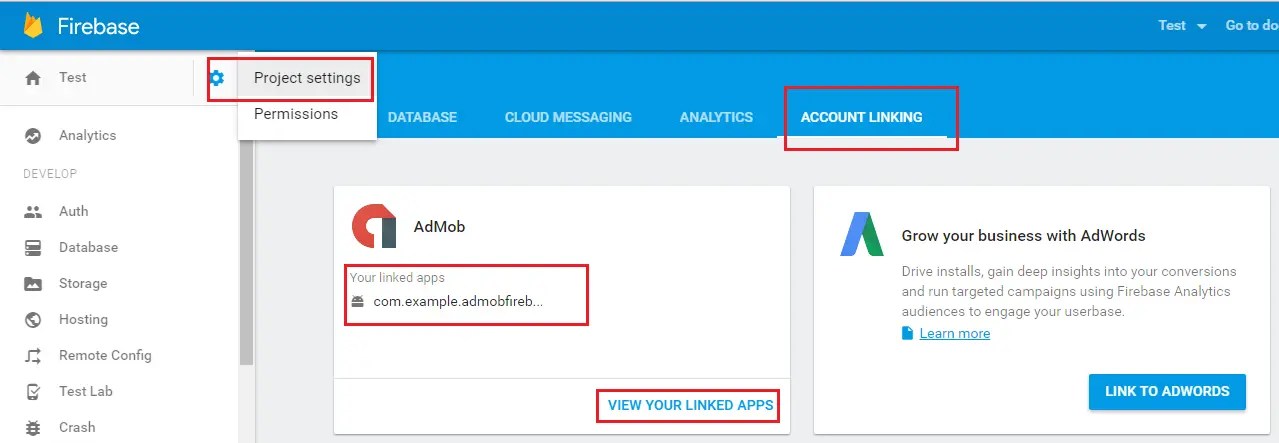
Link your app from AdMob to Firebase
If you want to see Firebase Analytics information in AdMob you have to link your app from AdMob account with Firebase project we have just configured earlier.
- From AdMob account, tap again on the Settings icon – App management
- Search your app and tap on the Link to Firebase

- Add the package name of your app you (in our example we have to use the package name we used when we configured our app directly in Firebase)

- Click Continue button and you should see the following screen

- In our example we let the first option to be enabled (Link to existing…) as we got an error that we cannot create a new Firebase project due to limit exceeded (even though we only have this project). Click the Continue button and done.


See your linked apps in Firebase Console