I finally decided to make a new post about the latest way of integrating Google Maps in Android applications. Please note that Google Maps Api v1 is now deprecated and supported by Google any more, so this is deprecated too. So you have to do some preliminary steps first.
What tools did I use?
- Android Studio 1.2.1.1
- Gradle
- As emulator I use Genymotion which is a lot faster than the Android Emulator, and it’s free for non-commercial use. But if you use Android emulator: “Firts of all you have to run the application with Google APIs add-on! To do this, go to AVD manager and create an emulator using GoogleApis.(example: if you have Android 4.3 Platform you must change it to Google APIs (Google Inc. ) – API Level 18)). “
First create a new project and make sure you have the java class called MyActivity (like in this tutorial) and a xml file for layout which should be called my_activity_layout.xml. So this xml should be found under res – layout – my_activity.xml.
Preliminary Steps
1. You have to make sure you have the Google Play Services installed and up to date. You can check if you have it from SDK Manager (Tools – Android – SDK Manager and you should find it under Extras)

2. Now that you are sure that you have Google Play Services you should add them to you project. In order to do this you should go to build.gradle and add this line of code to dependencies and then tap the sync button that appears in the right corner of the screen.
compile 'com.google.android.gms:play-services:7.3.0'

3. Now you should open your AndroidManifest.xml file and add this code within the application tags.
<meta-data
            android:name="com.google.android.gms.version"
            android:value="@integer/google_play_services_version" />
Get an Android SHA1 Certificate Fingerprint
Even if you already have a certificate and key, for the v2 version you have to get new ones, because the mechanism used now is different from the v1 version and the old certificates don’t work for v2.
Step 2: Now open cmd and change the default path to where your Java is installed. In my case it is installed in C:\Program Files\Java\jre6\bin. So, to get to this path you have to use the command “cd..” until you have only “C:\”. After this, type “cd Program Files”-press enter button – “cd Java” – press enter button – “cd jre6″ – press enter button – “cd bin”- press enter button. Of course if your Java files are installed somewhere else you have to change the directory to where they are. You have to get to Java\bin because here is the keytool.
keytool.exe -list -v -alias androiddebugkey -keystore “C:\android\debug.keystore” -storepass android -keypass android

You will need the SHA1 certificate fingerprint.
Get Google Maps Api key
1. Open Google APIs Console from your browser.
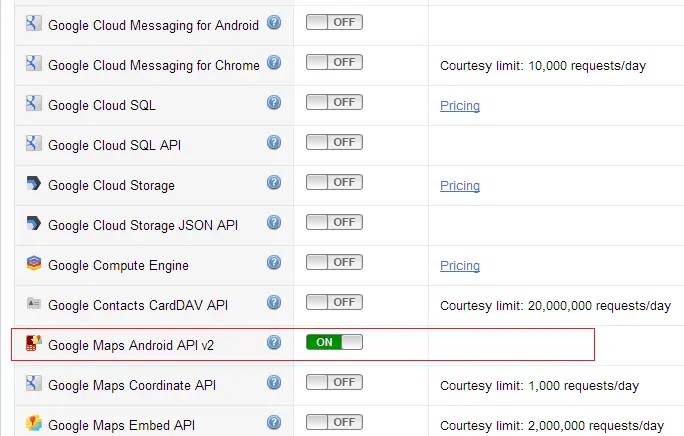
2. In the left menu, click on Services and enable Google Maps Android API v2.

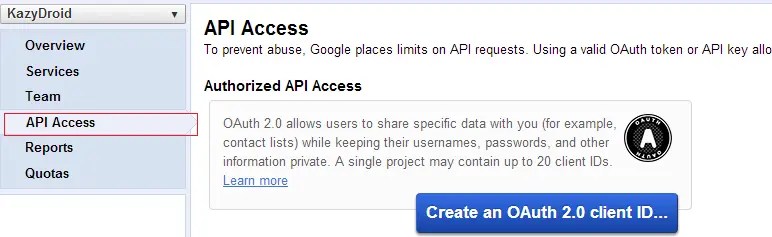
3. Now, click on API Access in the left menu and after the page is loaded click on Create New Android Key button.

4. In order to create the Android Key you have to introduce
SHA1 Certificate + “;” + Your project package name
In our example we would have something like this:
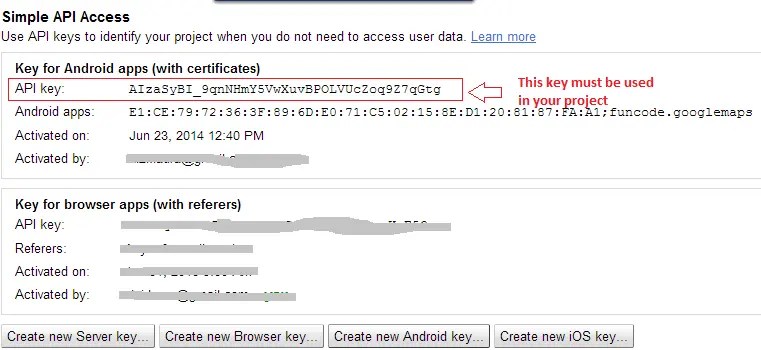
E1:CE:79:72:36:3F:89:6D:E0:71:C5:02:15:8E:D1:20:81:87:FA:A1;funcode.googlemaps
If you have trouble reading your package name you can easily read it from AndroidManifest.xml file at “package” tag.
<meta-data
    android:name="com.google.android.maps.v2.API_KEY"
    android:value="YOUR_API_KEY"/>
So a concrete example is something like this:
<meta-data
            android:name="com.google.android.maps.v2.API_KEY"
            android:value="AIzaSyBI_9qnNHmY5VwXuvBPOLVUcZoq9Z7qGtg"/>
2. Add permissions
You have to set the following permissions:
<uses-permission android:name="android.permission.ACCESS_COARSE_LOCATION"/>
<uses-permission android:name="android.permission.ACCESS_FINE_LOCATION"/>
Also you can set these 2 permissions as Google recommends them to be set, but they are not required.
<uses-permission android:name="android.permission.ACCESS_COARSE_LOCATION"/>
<uses-permission android:name="android.permission.ACCESS_FINE_LOCATION"/>
3. Specify requirement for OpenGL ES version 2. OpenGL is necessary for rendering the map, and this prevents Play Store from displaying the app on devices that don’t support OpenGL ES version 2. Also this notifies external services that OpenGL is required.
<uses-feature
        android:glEsVersion="0x00020000"
        android:required="true"/>
NOTE: This is the final AndroidManifest.xml file
<?xml version="1.0" encoding="utf-8"?>
<manifest xmlns:android="http://schemas.android.com/apk/res/android"
    package="funcode.googlemaps" >

    <uses-permission android:name="android.permission.INTERNET"/>
    <uses-permission android:name="android.permission.ACCESS_NETWORK_STATE"/>
    <uses-permission android:name="android.permission.WRITE_EXTERNAL_STORAGE"/>

    <uses-feature
        android:glEsVersion="0x00020000"
        android:required="true"/>

    <application
        android:allowBackup="true"
        android:icon="@drawable/ic_launcher"
        android:label="@string/app_name"
        android:theme="@style/AppTheme" >


        <activity
            android:name=".MyActivity"
            android:label="@string/app_name" >
            <intent-filter>
                <action android:name="android.intent.action.MAIN" />

                <category android:name="android.intent.category.LAUNCHER" />
            </intent-filter>
        </activity>

        <meta-data
            android:name="com.google.android.gms.version"
            android:value="@integer/google_play_services_version" />

        <meta-data
            android:name="com.google.android.maps.v2.API_KEY"
            android:value="AIzaSyBI_9qnNHmY5VwXuvBPOLVUcZoq9Z7qGtg"/>
    </application>

</manifest>
4. Now go to layout xml (res – layout – my_activity_layout.xml) and make sure you have exactly the same code as below:
<?xml version="1.0" encoding="utf-8"?>
<fragment xmlns:android="http://schemas.android.com/apk/res/android"
    android:id="@+id/map"
    android:layout_width="match_parent"
    android:layout_height="match_parent"
    android:name="com.google.android.gms.maps.MapFragment"/>
5. Now go to MyActivity and add the following code:
import android.app.Activity;
import android.os.Bundle;


public class MyActivity extends Activity {

    @Override
    protected void onCreate(Bundle savedInstanceState) {
        super.onCreate(savedInstanceState);
        setContentView(R.layout.my_activity_layout);
    }
}
And that’s it. Now the new Google Maps API v2 should work for you too.

I really hope this tutorial helped you. For any questions or suggestions please comment below.