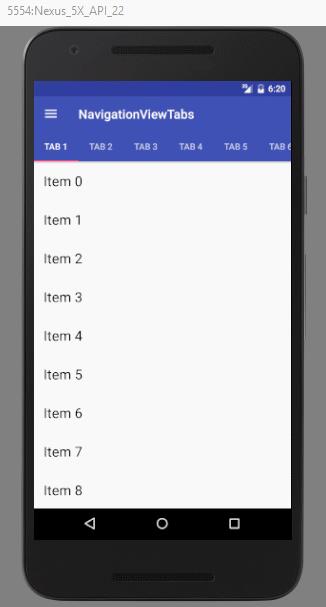
In this tutorial we will create a simple app which has a NavigationView, a Toolbar with Tabs and a simple list of items, that are displayed for each selected tab.
Tools used:
- Android Studio 2.2 Preview 4
- Android Emulator 5x API 22
Project
- Create a new project by choosing the empty template and then click the Next button until the project is created.
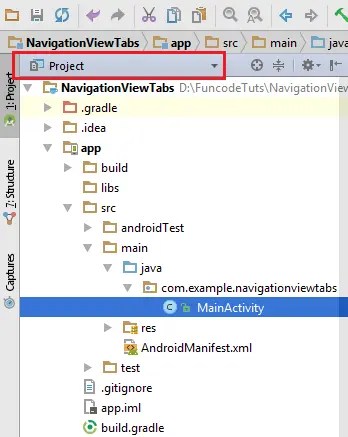
- Switch the visibility of project structure by selecting “Project” option like in the image below.

Part 1: NavigationView
First, we will create the NavigationView like explained further in the tutorial.
Summary
- add compile ‘com.android.support:design:24.0.0’ to dependencies in build.gradle
- handle theme setup in values – styles.xml
- handle theme setup in values-v21 – styles.xml
- set the themes in AndroidManifiest.xml
- create menu items for NavigationView
- add strings in strings.xml
- add dimensions for NavigationView’s header in dimens.xml
- create the xml file for the NavigationView’s header
- set TabLayout and NavigationView in the activity_main.xml
- setup NavigationView in MainActiviy.java
Explanation
-
build.gradle
In the app module directory, open the build.gradle file and add ‘com.android.support:design:24.0.0’ to dependencies.
apply plugin: 'com.android.application'

android {
    compileSdkVersion 24
    buildToolsVersion "24.0.0"
    defaultConfig {
        applicationId "com.example.navigationviewtabs"
        minSdkVersion 15
        targetSdkVersion 24
        versionCode 1
        versionName "1.0"
        testInstrumentationRunner "android.support.test.runner.AndroidJUnitRunner"
    }
    buildTypes {
        release {
            minifyEnabled false
            proguardFiles getDefaultProguardFile('proguard-android.txt'), 'proguard-rules.pro'
        }
    }
}

dependencies {
    compile fileTree(dir: 'libs', include: ['*.jar'])
    androidTestCompile('com.android.support.test.espresso:espresso-core:2.2.2', {
        exclude group: 'com.android.support', module: 'support-annotations'
    })
    compile 'com.android.support:appcompat-v7:24.0.0'
    compile 'com.android.support:design:24.0.0'
    compile 'com.android.support.constraint:constraint-layout:1.0.0-alpha3'
    testCompile 'junit:junit:4.12'
}
-
Theme setup in values – styles.xml
Under app – src- main – res – values – styles.xml, set the default AppTheme to support a NoActionBar theme.
Styles.xml from this directory, will be used for Android versions lower than API Level 21 (Lollipop). Also, keep in mind that for lower versions of Android the status bar won’t be transparent when the NavigationView is opened.
<resources>

    <!-- Base application theme. It will be used to set the theme for the application in AndroidManifest.xml -->
    <style name="AppTheme" parent="Theme.AppCompat.Light.NoActionBar">
        <!-- Customize your theme here. -->
        <item name="colorPrimary">@color/colorPrimary</item>
        <item name="colorPrimaryDark">@color/colorPrimaryDark</item>
        <item name="colorAccent">@color/colorAccent</item>
        <item name="windowActionBar">false</item>
        <item name="windowNoTitle">true</item>
    </style>

    <!-- This will be used to set the theme for the MainActivity in AndroidManifest.xml-->
    <style name="AppTheme.NoActionBar">
        <item name="windowActionBar">false</item>
        <item name="windowNoTitle">true</item>
    </style>

    <!-- This will be used to set the theme for AppBarLayout from activity_main.xml -->
    <style name="AppTheme.AppBarOverlay" parent="ThemeOverlay.AppCompat.Dark.ActionBar" />

</resources>
-
Theme setup in values-v21 – styles.xml
You will have to create this directory because we will use 2 attributes which are available only for Lollipop and above. The directory must be created like this:
- Right click on the res directory
- Click New – Android resource directory
- Select values directory and api level like in the image below:

- Now, inside this directory create a styles.xml file like this:
- right click on the values-v21 directory
- click New – Values resource file
- write styles.xml
- This is the code you should add:
<resources>
    <style name="AppTheme.NoActionBar">
        <item name="windowActionBar">false</item>
        <item name="windowNoTitle">true</item>
        <item name="android:windowDrawsSystemBarBackgrounds">true</item>
        <item name="android:statusBarColor">@android:color/transparent</item>
    </style>
</resources>

The 2 attributes that are available only from API Level 21 and above are:
android:windowDrawsSystemBarBackgrounds: Flag indicating whether this Window is responsible for drawing the background for the system bars. If true and the window is not floating, the system bars are drawn with a transparent background and the corresponding areas in this window are filled with the colors specified in {@link android.R.attr#statusBarColor} and {@link android.R.attr#navigationBarColor}.android:statusBarColor: this will make the status bar transparent when the NavigationView is opened
-
Set themes in AndroidManifest.xml
<?xml version="1.0" encoding="utf-8"?> <manifest xmlns:android="http://schemas.android.com/apk/res/android" package="com.example.navigationviewtabs"> <application android:allowBackup="true" android:icon="@mipmap/ic_launcher" android:label="@string/app_name" android:supportsRtl="true" android:theme="@style/AppTheme"> <activity android:name=".MainActivity" android:theme="@style/AppTheme.NoActionBar"> <intent-filter> <action android:name="android.intent.action.MAIN" /> <category android:name="android.intent.category.LAUNCHER" /> </intent-filter> </activity> </application> </manifest> -
Menu items for NavigationView
Now, we will have to create a menu directory in which we will have to create a xml file containing the NavigationView items.
- Right click on the res directory
- Click New – Android resource directory
- Select menu directory

- Now right click on the menu directory
- Click New – Values resource file
- Write navigation_items.xml
- Add the following code:
<?xml version="1.0" encoding="utf-8"?>
<menu xmlns:android="http://schemas.android.com/apk/res/android">
    <group android:checkableBehavior="single">
        <item
            android:id="@+id/navigation_item_favorites"
            android:checked="true"
            android:title="Item 1"/>
        <item
            android:id="@+id/navigation_item_categories"
            android:title="Item 2"/>
        <item
            android:id="@+id/navigation_item_extra"
            android:checked="true"
            android:title="Item 3"/>
    </group>
</menu>
-
strings.xml
Add the following strings to res – values – strings.xml
<resources>
    <string name="app_name">NavigationViewTabs</string>

    <string name="navigation_drawer_open">Open navigation drawer</string>
    <string name="navigation_drawer_close">Close navigation drawer</string>
</resources>

-
dimens.xml
Go to res – values – dimens.xml and add the following code.
<resources> <!-- Default screen margins, per the Android Design guidelines. --> <dimen name="nav_header_vertical_spacing">16dp</dimen> <dimen name="nav_header_height">160dp</dimen> <!-- Default screen margins, per the Android Design guidelines. --> <dimen name="activity_horizontal_margin">16dp</dimen> <dimen name="activity_vertical_margin">16dp</dimen> </resources> -
nav_header.xml
Under res – layout create a new xml file and name it nav_header.xml. This layout will be added as header to the NavigationView. It contains 2 texts and an icon (this file is taken from the NavigationView project from Android Studio Templates).
<?xml version="1.0" encoding="utf-8"?>
<LinearLayout xmlns:android="http://schemas.android.com/apk/res/android"
    xmlns:app="http://schemas.android.com/apk/res-auto"
    android:layout_width="match_parent"
    android:layout_height="@dimen/nav_header_height"
    android:background="@color/colorPrimary"
    android:gravity="bottom"
    android:orientation="vertical"
    android:paddingBottom="@dimen/activity_vertical_margin"
    android:paddingLeft="@dimen/activity_horizontal_margin"
    android:paddingRight="@dimen/activity_horizontal_margin"
    android:paddingTop="@dimen/activity_vertical_margin"
    android:theme="@style/ThemeOverlay.AppCompat.Dark">

    <ImageView
        android:id="@+id/imageView"
        android:layout_width="wrap_content"
        android:layout_height="wrap_content"
        android:paddingTop="@dimen/nav_header_vertical_spacing"
        app:srcCompat="@android:drawable/sym_def_app_icon" />

    <TextView
        android:layout_width="match_parent"
        android:layout_height="wrap_content"
        android:paddingTop="@dimen/nav_header_vertical_spacing"
        android:text="Android Studio"
        android:textAppearance="@style/TextAppearance.AppCompat.Body1" />

    <TextView
        android:id="@+id/textView"
        android:layout_width="wrap_content"
        android:layout_height="wrap_content"
        android:text="android.studio@android.com" />

</LinearLayout>
-
activity_main.xml
In this xml file we will set the NavigationView, toolbar and tabs, using CoordinatorLayout. In the image below, we have described the hierarchy of the views (which view contains which view).

<?xml version="1.0" encoding="utf-8"?>
<android.support.v4.widget.DrawerLayout xmlns:android="http://schemas.android.com/apk/res/android"
    xmlns:app="http://schemas.android.com/apk/res-auto"
    android:id="@+id/drawer_layout"
    android:layout_width="match_parent"
    android:layout_height="match_parent"
    android:fitsSystemWindows="true">

    <android.support.design.widget.CoordinatorLayout
        android:layout_width="match_parent"
        android:layout_height="match_parent">

        <android.support.design.widget.AppBarLayout
            android:layout_width="match_parent"
            android:layout_height="wrap_content"
            android:theme="@style/AppTheme.AppBarOverlay">

            <android.support.v7.widget.Toolbar
                android:id="@+id/toolbar"
                android:layout_width="match_parent"
                android:layout_height="?attr/actionBarSize"
                app:layout_scrollFlags="scroll|enterAlways" />

            <android.support.design.widget.TabLayout
                android:id="@+id/tab_layout"
                android:layout_width="match_parent"
                android:layout_height="wrap_content"
                app:layout_scrollFlags="scroll|enterAlways"
                app:tabMode="scrollable" />

        </android.support.design.widget.AppBarLayout>

        <FrameLayout
            android:id="@+id/container"
            android:layout_width="match_parent"
            android:layout_height="match_parent"
            app:layout_behavior="@string/appbar_scrolling_view_behavior"/>
    </android.support.design.widget.CoordinatorLayout>

    <android.support.design.widget.NavigationView
        android:id="@+id/navigation_drawer"
        android:layout_width="wrap_content"
        android:layout_height="match_parent"
        android:layout_gravity="start"
        app:menu="@menu/navigation_items"
        app:headerLayout="@layout/nav_header"/>

</android.support.v4.widget.DrawerLayout>
As you can see, DrawerLayout is the root view of this layout and this is the correct way to do it. If you embed DrawerLayout inside other layout (let’s say a RelativeLayout as root view) and you place other UI components outside the DrawerLayout, those UI components will overlap the NavigationView when opened like below:
- Another wrong example, that I did in a project of mine, was that I used CoordinatorLayout as root view instead of DrawerLayout. And because of that, the navigationView was not being opened over the status bar.Also, you have to keep in mind that FrameLayout (the container) will be replaced in Java code with ContainerFragment.java fragment. This class handles the displaying of the list of items and tabs. You will see later how to use this class. So, by using the correct hierarchy, we can now play with scroll events for the toolbar, due to the use of CoordinatorLayout. But if we don’t follow this hierarchy, the scroll events or UI elements might behave in a strange way.


Explanation of some properties
android:fitsSystemWindows="true"Read TYL 15android:theme="@style/AppTheme.AppBarOverlay"Read TYL 16app:layout_scrollFlags="scroll|enterAlways"Read TYL 17app:tabMode="scrollable"Read TYL 11app:layout_behavior="@string/appbar_scrolling_view_behavior"Read TYL 13
-
MainActivity.java (intermediary code)
package com.example.navigationviewtabs;

import android.os.Bundle;
import android.support.v4.view.GravityCompat;
import android.support.v4.widget.DrawerLayout;
import android.support.v7.app.ActionBarDrawerToggle;
import android.support.v7.app.AppCompatActivity;
import android.support.v7.widget.Toolbar;

public class MainActivity extends AppCompatActivity {

    private DrawerLayout mDrawerLayout;
    private ActionBarDrawerToggle mActionBarDrawerToggle;

    @Override
    protected void onCreate(Bundle savedInstanceState) {
        super.onCreate(savedInstanceState);
        setContentView(R.layout.activity_main);

        Toolbar toolbar = (Toolbar) findViewById(R.id.toolbar);
        setSupportActionBar(toolbar);

        mDrawerLayout = (DrawerLayout) findViewById(R.id.drawer_layout);
        // Code here will be triggered once the drawer closes as we don't want anything to happen so we leave this blank
        mActionBarDrawerToggle = new ActionBarDrawerToggle(this, mDrawerLayout,
                toolbar, R.string.navigation_drawer_open, R.string.navigation_drawer_close);

        //calling sync state is necessary or else your hamburger icon wont show up
        mActionBarDrawerToggle.syncState();
    }

    @Override
    public void onBackPressed() {
        if (mDrawerLayout.isDrawerOpen(GravityCompat.START)) {
            mDrawerLayout.closeDrawer(GravityCompat.START);
        } else {
            super.onBackPressed();
        }
    }
}
At this point, you can run the app to see how the NavigationView looks like and how it behaves on different Android versions (pre-Lollipop and from Lollipop and above).
Next, we will proceed to part 2 of this tutorial: on setting up the tabs.
Part 2: Setup Tabs
Summary
- setup xml file with ViewPager for the container view
- setup xml file with RecyclerView for a page from ViewPager
- setup xml file with a title TextView for RecyclerView rows
- create a new Java class for RecyclerView’s adapter
- create a new Fragment for ViewPager’s pages
- create a new Fragment which represents the container. From here we will create the tabs and handle ViewPager’s adapter.
Project
-
fragment_container.xml
<FrameLayout xmlns:android="http://schemas.android.com/apk/res/android"
    xmlns:tools="http://schemas.android.com/tools"
    android:layout_width="match_parent"
    android:layout_height="match_parent"
    tools:context="com.example.navigationviewtabs.ContainerFragment">

    <android.support.v4.view.ViewPager
        android:layout_width="fill_parent"
        android:layout_height="fill_parent"
        android:id="@+id/viewPager"/>

</FrameLayout>
-
fragment_page.xml
<FrameLayout xmlns:android="http://schemas.android.com/apk/res/android" xmlns:tools="http://schemas.android.com/tools" android:layout_width="match_parent" android:layout_height="match_parent" android:orientation="vertical" tools:context="com.example.navigationviewtabs.MainActivity"> <android.support.v7.widget.RecyclerView android:id="@+id/main_recycler" android:layout_width="match_parent" android:layout_height="match_parent" android:background="@android:color/white"/> </FrameLayout> -
recycler_item.xml
<?xml version="1.0" encoding="utf-8"?>
<LinearLayout xmlns:android="http://schemas.android.com/apk/res/android"
    android:id="@+id/card_view_item"
    android:layout_width="match_parent"
    android:layout_height="wrap_content"
    android:background="?android:attr/selectableItemBackground">

    <TextView
        android:id="@+id/title"
        android:layout_width="fill_parent"
        android:layout_height="wrap_content"
        android:textAppearance="?android:attr/textAppearanceLarge"
        android:textColor="@android:color/black"
        android:padding="16dp"/>

</LinearLayout>
Note:
android:background="?android:attr/selectableItemBackground"is used in order to have a click effect on the RecyclerView when its rows are clicked. -
SimpleRecyclerAdapter.java
package com.example.navigationviewtabs; import android.support.v7.widget.RecyclerView; import android.view.LayoutInflater; import android.view.View; import android.view.ViewGroup; import android.widget.TextView; import java.util.ArrayList; import java.util.List; public class SimpleRecyclerAdapter extends RecyclerView.Adapter<SimpleRecyclerAdapter.ViewHolder> { private List<String> mItemsList; private PageFragment.OnListItemClickListener mListItemClickListener; public SimpleRecyclerAdapter(List<String> itemsList) { mItemsList = itemsList == null ? new ArrayList<String>() : itemsList; } @Override public ViewHolder onCreateViewHolder(ViewGroup parent, int viewType) { // Create a new view by inflating the row item xml. View v = LayoutInflater.from(parent.getContext()) .inflate(R.layout.recycler_item, parent, false); // Set the view to the ViewHolder return new ViewHolder(v); } @Override public void onBindViewHolder(ViewHolder holder, int position) { final String itemTitle = mItemsList.get(position); holder.title.setText(itemTitle); } @Override public int getItemCount() { return mItemsList.size(); } // Create the ViewHolder class to keep references to your views public class ViewHolder extends RecyclerView.ViewHolder implements View.OnClickListener { public TextView title; /** * Constructor * @param v The container view which holds the elements from the row item xml */ public ViewHolder(View v) { super(v); title = (TextView) v.findViewById(R.id.title); v.setOnClickListener(this); } @Override public void onClick(View view) { if (null != mListItemClickListener) { // Notify the active callbacks interface (the activity, if the // fragment is attached to one) that an item has been selected. mListItemClickListener.onListItemClick(mItemsList.get(getAdapterPosition())); } } } public void setOnItemTapListener(PageFragment.OnListItemClickListener itemClickListener) { mListItemClickListener = itemClickListener; } } -
PageFragment.java
package com.example.navigationviewtabs; import android.content.Context; import android.os.Bundle; import android.support.v4.app.Fragment; import android.support.v7.widget.LinearLayoutManager; import android.support.v7.widget.RecyclerView; import android.view.LayoutInflater; import android.view.View; import android.view.ViewGroup; import java.util.ArrayList; import java.util.List; public class PageFragment extends Fragment { private OnListItemClickListener mListItemClickListener; /** * Use this factory method to create a new instance of * this fragment using the provided parameters. * * @return A new instance of fragment PageFragment. */ public static PageFragment newInstance() { return new PageFragment(); } public PageFragment() { // Required empty public constructor } @Override public void onCreate(Bundle savedInstanceState) { super.onCreate(savedInstanceState); } @Override public View onCreateView(LayoutInflater inflater, ViewGroup container, Bundle savedInstanceState) { // Inflate the layout for this fragment View view = inflater.inflate(R.layout.fragment_page, container, false); RecyclerView recyclerView = (RecyclerView) view.findViewById(R.id.main_recycler); LinearLayoutManager linearLayoutManager = new LinearLayoutManager(getActivity().getBaseContext()); recyclerView.setLayoutManager(linearLayoutManager); recyclerView.setHasFixedSize(true); List<String> list = new ArrayList<>(); for (int i = 0; i < 10; i++) { list.add("Item " + i); } SimpleRecyclerAdapter adapter = new SimpleRecyclerAdapter(list); recyclerView.setAdapter(adapter); adapter.setOnItemTapListener(mListItemClickListener); return view; } @Override public void onAttach(Context context) { super.onAttach(context); try { mListItemClickListener = (OnListItemClickListener) context; } catch (ClassCastException e) { throw new ClassCastException(context.toString() + " must implement OnListItemClickListener"); } } @Override public void onDetach() { super.onDetach(); mListItemClickListener = null; } public interface OnListItemClickListener { void onListItemClick(String title); } } -
ContainerFragment.java
package com.example.navigationviewtabs; import android.content.Context; import android.os.Bundle; import android.support.v4.app.Fragment; import android.support.v4.app.FragmentManager; import android.support.v4.app.FragmentStatePagerAdapter; import android.support.v4.view.ViewPager; import android.view.LayoutInflater; import android.view.View; import android.view.ViewGroup; import java.util.ArrayList; import java.util.List; public class ContainerFragment extends Fragment { private TabLayoutSetupCallback mToolbarSetupCallback; private List<String> mTabNamesList; public ContainerFragment() { // Required empty public constructor } @Override public void onAttach(Context context) { super.onAttach(context); if (context instanceof MainActivity) { mToolbarSetupCallback = (TabLayoutSetupCallback) context; } else { throw new ClassCastException(context.toString() + " must implement TabLayoutSetupCallback"); } } @Override public void onCreate(Bundle savedInstanceState) { super.onCreate(savedInstanceState); mTabNamesList = new ArrayList<>(); mTabNamesList.add("Tab 1"); mTabNamesList.add("Tab 2"); mTabNamesList.add("Tab 3"); mTabNamesList.add("Tab 4"); mTabNamesList.add("Tab 5"); mTabNamesList.add("Tab 6"); mTabNamesList.add("Tab 7"); mTabNamesList.add("Tab 8"); } @Override public View onCreateView(LayoutInflater inflater, ViewGroup container, Bundle savedInstanceState) { // Inflate the layout for this fragment View view = inflater.inflate(R.layout.fragment_container, container, false); ViewPager viewPager = (ViewPager) view.findViewById(R.id.viewPager); viewPager.setAdapter(new ItemsPagerAdapter(getChildFragmentManager(), mTabNamesList)); mToolbarSetupCallback.setupTabLayout(viewPager); return view; } public static class ItemsPagerAdapter extends FragmentStatePagerAdapter { private List<String> mTabs = new ArrayList<>(); public ItemsPagerAdapter(FragmentManager fm, List<String> tabNames) { super(fm); mTabs = tabNames; } @Override public Fragment getItem(int position) { return PageFragment.newInstance(); } @Override public int getItemPosition(Object object) { return POSITION_NONE; } @Override public int getCount() { return mTabs.size(); } @Override public CharSequence getPageTitle(int position) { return mTabs.get(position); } } public interface TabLayoutSetupCallback { void setupTabLayout(ViewPager viewPager); } } -
MainActivity.java (final)
package com.example.navigationviewtabs;

import android.os.Bundle;
import android.support.design.widget.TabLayout;
import android.support.v4.app.FragmentManager;
import android.support.v4.app.FragmentTransaction;
import android.support.v4.view.GravityCompat;
import android.support.v4.view.ViewPager;
import android.support.v4.widget.DrawerLayout;
import android.support.v7.app.ActionBarDrawerToggle;
import android.support.v7.app.AppCompatActivity;
import android.support.v7.widget.Toolbar;
import android.widget.Toast;

public class MainActivity extends AppCompatActivity implements ContainerFragment.TabLayoutSetupCallback,
        PageFragment.OnListItemClickListener {

    private DrawerLayout mDrawerLayout;
    private ActionBarDrawerToggle mActionBarDrawerToggle;

    @Override
    protected void onCreate(Bundle savedInstanceState) {
        super.onCreate(savedInstanceState);
        setContentView(R.layout.activity_main);

        Toolbar toolbar = (Toolbar) findViewById(R.id.toolbar);
        setSupportActionBar(toolbar);

        mDrawerLayout = (DrawerLayout) findViewById(R.id.drawer_layout);
        // Code here will be triggered once the drawer closes as we don't want anything to happen so we leave this blank
        mActionBarDrawerToggle = new ActionBarDrawerToggle(this, mDrawerLayout,
                toolbar, R.string.navigation_drawer_open, R.string.navigation_drawer_close);

        //calling sync state is necessary or else your hamburger icon wont show up
        mActionBarDrawerToggle.syncState();

        if (savedInstanceState == null) {
            // update the main content by replacing fragments
            FragmentManager fragmentManager = getSupportFragmentManager();
            fragmentManager.popBackStackImmediate(null, FragmentManager.POP_BACK_STACK_INCLUSIVE);
            FragmentTransaction transaction = fragmentManager.beginTransaction();

            transaction.replace(R.id.container, new ContainerFragment());
            transaction.commit();
        }
    }

    @Override
    public void onBackPressed() {
        if (mDrawerLayout.isDrawerOpen(GravityCompat.START)) {
            mDrawerLayout.closeDrawer(GravityCompat.START);
        } else {
            super.onBackPressed();
        }
    }

    @Override
    public void setupTabLayout(ViewPager viewPager) {
        TabLayout tabLayout = (TabLayout) findViewById(R.id.tab_layout);
        tabLayout.setupWithViewPager(viewPager);
    }

    @Override
    public void onListItemClick(String title) {
        Toast.makeText(this, title, Toast.LENGTH_SHORT).show();
    }
}
You can also see the project on Github.
