Hi, in today’s tutorial I will show you how to create a list with the newest widget presented at Google I/O 2014, RecyclerView. Also I will show how to add click and long click events within adapter.
WHAT’S DIFFERENT?
- is a more advanced and flexible version of ListView
- it forces the implementation of ViewHolder pattern
- the recycling process is more efficient
- before you had to create only the ListView and the Adapter, now you have to create the ListView, a LayoutManager and the Adapter.
- the LayoutManager avoids the calling of findViewById for too many times
- in the adapter we will have to implement 2 important methods which “replace” the old getView() method. The methods are onCreateViewHolder() and onBindViewHolder().
- In onCreateViewHolder() we init the layout (xml file) for the row
- in the construcor of our ViewHolder we will init the views (using findViewById) from our xml file
- in onBindViewHolder() we set the data which has to be displayed on the row (text, colors, etc)
Let’s start
1. Create a new project and name your main activity MyActivity. (At this step do not write anything in this class).
Your build.gradle file should look like this:
apply plugin: 'com.android.application'

android {
    compileSdkVersion 24
    buildToolsVersion "24.0.0"
    defaultConfig {
        applicationId "com.example.myapplication"
        minSdkVersion 15
        targetSdkVersion 24
        versionCode 1
        versionName "1.0"
        testInstrumentationRunner "android.support.test.runner.AndroidJUnitRunner"
    }
    buildTypes {
        release {
            minifyEnabled false
            proguardFiles getDefaultProguardFile('proguard-android.txt'), 'proguard-rules.pro'
        }
    }
}

dependencies {
    compile fileTree(dir: 'libs', include: ['*.jar'])
    androidTestCompile('com.android.support.test.espresso:espresso-core:2.2.2', {
        exclude group: 'com.android.support', module: 'support-annotations'
    })
    compile 'com.android.support:appcompat-v7:24.0.0'
    compile 'com.android.support:design:24.0.0'
    compile 'com.android.support.constraint:constraint-layout:1.0.0-alpha3'
    testCompile 'junit:junit:4.12'
}
Before, it was needed to specifically add RecyclerView to dependencies 'com.android.support:recyclerview-v7:+'. But now, this is not needed anymore as RecyclerView is in the appCompat library 'com.android.support:appcompat-v7'.
2. Create an xml (or rename the generated one) and name it “my_activity_layout.xml”.
<RelativeLayout xmlns:android="http://schemas.android.com/apk/res/android"
    xmlns:tools="http://schemas.android.com/tools"
    android:layout_width="match_parent"
    android:layout_height="match_parent"
    android:paddingLeft="@dimen/activity_horizontal_margin"
    android:paddingRight="@dimen/activity_horizontal_margin"
    android:paddingTop="@dimen/activity_vertical_margin"
    android:paddingBottom="@dimen/activity_vertical_margin"
    tools:context=".MyActivity">

    <android.support.v7.widget.RecyclerView
        android:id="@+id/my_recycler_view"
        android:scrollbars="vertical"
        android:layout_width="match_parent"
        android:layout_height="match_parent"/>

</RelativeLayout>
3. Create a new xml and name it “item_row.xml”
<?xml version="1.0" encoding="utf-8"?>
<LinearLayout xmlns:android="http://schemas.android.com/apk/res/android"
    android:layout_width="match_parent"
    android:layout_height="wrap_content"
    android:orientation="horizontal"
    android:gravity="center_vertical"
    android:id="@+id/layout">

    <TextView
        android:id="@+id/rowNumberTextView"
        android:layout_width="wrap_content"
        android:layout_height="wrap_content"/>

    <TextView
        android:id="@+id/nameTextView"
        android:layout_width="wrap_content"
        android:layout_height="wrap_content"/>

</LinearLayout>
4. Create a new java class for the adapter and name it “MyCustomAdapter”
import android.content.Context;
import android.graphics.Color;
import android.support.v7.widget.RecyclerView;
import android.view.LayoutInflater;
import android.view.View;
import android.view.ViewGroup;
import android.widget.TextView;
import android.widget.Toast;
import java.util.ArrayList;
public class MyCustomAdapter extends RecyclerView.Adapter<MyCustomAdapter.ViewHolder> implements View.OnClickListener,
View.OnLongClickListener{
private ArrayList<String> mDataset;
private static Context sContext;
// Adapter's Constructor
public MyCustomAdapter(Context context, ArrayList<String> myDataset) {
mDataset = myDataset;
sContext = context;
}
// Create new views. This is invoked by the layout manager.
@Override
public MyCustomAdapter.ViewHolder onCreateViewHolder(ViewGroup parent,
int viewType) {
// Create a new view by inflating the row item xml.
View v = LayoutInflater.from(parent.getContext())
.inflate(R.layout.item_row, parent, false);
// Set the view to the ViewHolder
ViewHolder holder = new ViewHolder(v);
holder.mNameTextView.setOnClickListener(MyCustomAdapter.this);
holder.mNameTextView.setOnLongClickListener(MyCustomAdapter.this);
holder.mNameTextView.setTag(holder);
return holder;
}
// Replace the contents of a view. This is invoked by the layout manager.
@Override
public void onBindViewHolder(ViewHolder holder, int position) {
holder.mNumberRowTextView.setText(String.valueOf(position) + ". ");
// Get element from your dataset at this position and set the text for the specified element
holder.mNameTextView.setText(mDataset.get(position));
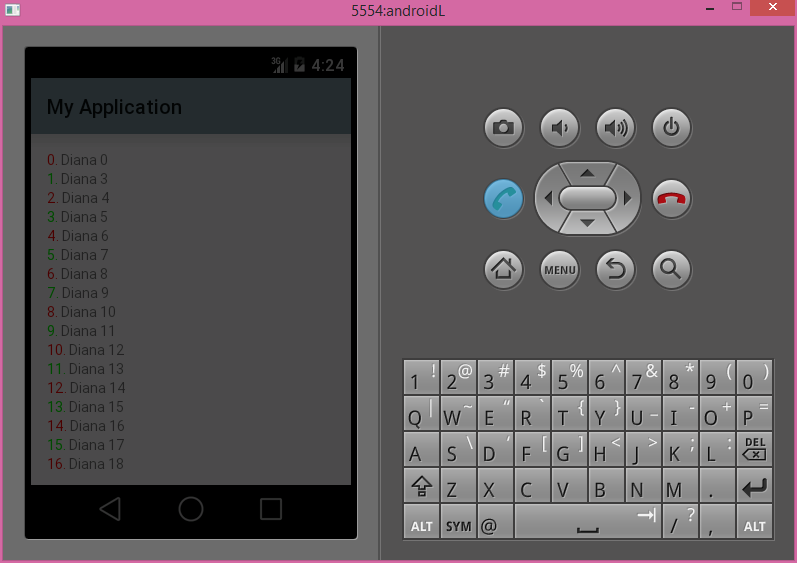
// Set the color to red if row is even, or to green if row is odd.
if (position % 2 == 0) {
holder.mNumberRowTextView.setTextColor(Color.RED);
} else {
holder.mNumberRowTextView.setTextColor(Color.GREEN);
}
}
// Return the size of your dataset (invoked by the layout manager)
@Override
public int getItemCount() {
return mDataset.size();
}
// Implement OnClick listener. The clicked item text is displayed in a Toast message.
@Override
public void onClick(View view) {
ViewHolder holder = (ViewHolder) view.getTag();
if (view.getId() == holder.mNameTextView.getId()) {
Toast.makeText(sContext, holder.mNameTextView.getText(), Toast.LENGTH_SHORT).show();
}
}
// Implement OnLongClick listener. Long Clicked items is removed from list.
@Override
public boolean onLongClick(View view) {
ViewHolder holder = (ViewHolder) view.getTag();
if (view.getId() == holder.mNameTextView.getId()) {
mDataset.remove(holder.getPosition());
// Call this method to refresh the list and display the "updated" list
notifyDataSetChanged();
Toast.makeText(sContext, "Item " + holder.mNameTextView.getText() + " has been removed from list",
Toast.LENGTH_SHORT).show();
}
return false;
}
// Create the ViewHolder class to keep references to your views
public static class ViewHolder extends RecyclerView.ViewHolder {
public TextView mNumberRowTextView;
public TextView mNameTextView;
/**
* Constructor
* @param v The container view which holds the elements from the row item xml
*/
public ViewHolder(View v) {
super(v);
mNumberRowTextView = (TextView) v.findViewById(R.id.rowNumberTextView);
mNameTextView = (TextView) v.findViewById(R.id.nameTextView);
}
}
}
5. Go to your “MyActivity” class and add the following code:
import android.app.Activity;
import android.os.Bundle;
import android.support.v7.widget.LinearLayoutManager;
import android.support.v7.widget.RecyclerView;

import java.util.ArrayList;

public class MyActivity extends Activity {

    @Override
    protected void onCreate(Bundle savedInstanceState) {
        super.onCreate(savedInstanceState);
        setContentView(R.layout.my_activity_layout);

        RecyclerView recyclerView = (RecyclerView) findViewById(R.id.my_recycler_view);

        // improve performance if you know that changes in content
        // do not change the size of the RecyclerView
        recyclerView.setHasFixedSize(true);

        // use a linear layout manager
        RecyclerView.LayoutManager mLayoutManager = new LinearLayoutManager(this);
        recyclerView.setLayoutManager(mLayoutManager);

        // Data set used by the adapter. This data will be displayed.
        ArrayList<String> myDataset = new ArrayList<String>();
        for (int i= 0; i < 70; i++){
            myDataset.add("Diana " + i);
        }

        // Create the adapter
        RecyclerView.Adapter adapter = new MyCustomAdapter(MyActivity.this, myDataset);
        recyclerView.setAdapter(adapter);
    }
}
Create an emulator which can run Android L (Api Level 20) and run the app.