I have just updated my Android Studio to Android Studio 0.8.2. But, after the update I kept getting these 3 errors while I was trying to run my project:
1. First error
Error:Execution failed for task
> java.io.FileNotFoundException: C:\Program Files (x86)\Android\android-studio\sdk\tools\proguard\proguard-android-optimize.txt (The system cannot find the path specified)
2. Second error (this happened only after the 1st error had been fixed)
Error:Execution failed for task
> Manifest merger failed : uses-sdk:minSdkVersion 9 cannot be smaller than version L declared in library com.android.support:appcompat-v7:21.0.0-rc1
3. Third Error (when running the app for Android L)
Error:compileSdkVersion android-L requires compiling with JDK 7
1. First error solution As a workaround I did the following steps:
- downloaded the proguard txt file (you can download it from here:[ddownload id=”453″ text=”proguard-android.txt”]).
- renamed it from proguard-android to proguard-android-optimize.txt
- created a new folder and named it proguard under
C:\Program Files (x86)\Android\android-studio\sdk\tools\
I don’t know exactly why I got this error as on my the other PC I did the update and everything was ok, but I found on the internet that there are other developers who had this problem (here). 2. Second error solution So after some research I found out that in one of my modules I had this in the dependencies from build.gradle:
compile 'com.android.support:appcompat-v7:+'
which I suppose represents the latest version which is 21.0.0. The support libraries of the preview of Android L work only if the minSDK is Android L. So, as in my case as I didn’t want to run the app for Android L, I had to set specifically the appcompat-v7 to 20 (the latest one before Android L). Below is the code:
compile 'com.android.support:appcompat-v7:20.+'

3. Third Error Solution
This means that Android L is working only with jdk 7. So in order to fix this error you have to do the following steps:
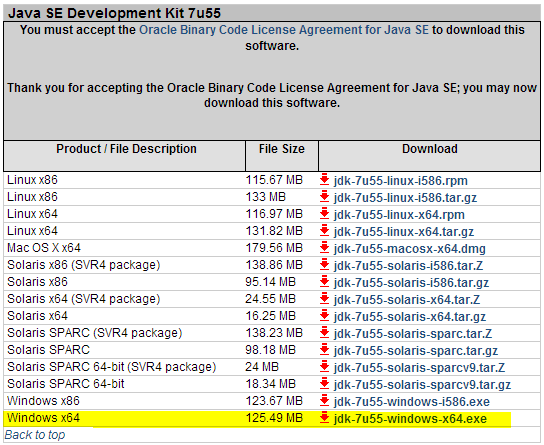
3.1. Install jdk 7. You can download the .dmg and .exe files from here.
MAC

Windows
3.2. After the dmg is downloded click on it to install the jdk.
3.3. After the jdk is installed open Project Structure from here:
![]()
or from File – Project Structure.
3.4. Now JDK location should be changed from :
MAC OS
/System/Library/Java/JavaVirtualMachines/jdk1.6.0.jdk/Contents/Home
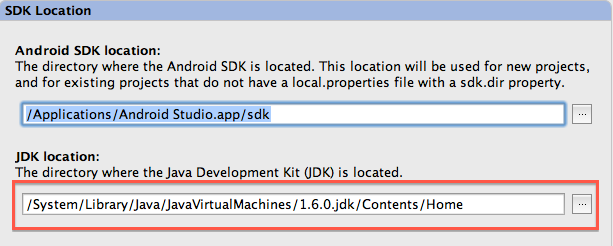
to:
/Library/Java/JavaVirtualMachines/jdk1.7.0_55.jdk/Contents/Home

Notice that on Mac OS they changed the path from /System/Library to /Library!
Windows
Change JDK location from:
C:\Program Files\Java\jdk1.6.0_45

to
C:\Program Files\Java\jdk1.7.0_55
